Mar 15, 2017
SPIDERMAN by Caro Childs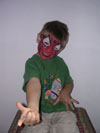
Ever popular, Spiderman, is more tricky than the customers realize. Being clear solid colour with fine lines and a design that everyone recognizes, leaves no room for artistic blending of wobbly lines. So here is a fail safe method of getting that super hero onto your wriggliest customer.
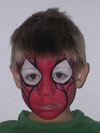
 1. Start by sponging Grimas cake white over and around
the eyes in a teardrop shape. Cake white is white enough to give a good contrast but it will not leach into the red and so your Spiderman will pass
the first hurdle and stay red with no pink bits.
1. Start by sponging Grimas cake white over and around
the eyes in a teardrop shape. Cake white is white enough to give a good contrast but it will not leach into the red and so your Spiderman will pass
the first hurdle and stay red with no pink bits.
.
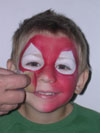 2. Next sponge a good red all over the face, except for
the eyes of course. I used Grimas 505 but any good deep red will be fine.
2. Next sponge a good red all over the face, except for
the eyes of course. I used Grimas 505 but any good deep red will be fine.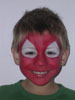
.
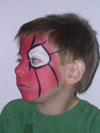
 3. With a large brush well loaded with black paint
(Paradise would be a good black to use) outline the white eye shapes. Take three brush strokes to do this as it is not an easy shape with difficult
planes of the face to negotiate. Start at the top of the tear drop and making a point with the brush pull a line down level with the corner of the
eye. Do the same on the other side of the tear drop and then join the two sides together with a line around the bottom edge. This should prevent you
smudging the line as the customer screws up his face as you attempt to turn the corner whilst keeping the brush at right angles to the skin!
3. With a large brush well loaded with black paint
(Paradise would be a good black to use) outline the white eye shapes. Take three brush strokes to do this as it is not an easy shape with difficult
planes of the face to negotiate. Start at the top of the tear drop and making a point with the brush pull a line down level with the corner of the
eye. Do the same on the other side of the tear drop and then join the two sides together with a line around the bottom edge. This should prevent you
smudging the line as the customer screws up his face as you attempt to turn the corner whilst keeping the brush at right angles to the skin!
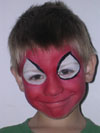
 4. Next arrange the lines that form the web around the face, Don't try to paint a line down the centre of the face it rarely works, better to radiate lines out on each side of the face, as shown.
 When you have the base of the web painted in, join the lines with slightly curved lines. Keep the curves dipping towards the centre of the face and make sure the lines start where the previous one finished so you don't end up painting bricks on a wall!
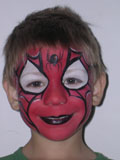
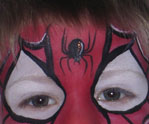 Finally add highlights, black lips if you can, and a spider.