We are closed from the 8th of July, till the 14th of July.
Any orders or questions after the 7th will be seen to from the 14th when we reopen!
---
Thank you for your patronage and understanding.
We are offfering a 15% discount on all DFX Neons pots with the discount code: SummerVibes
Mar 15, 2017
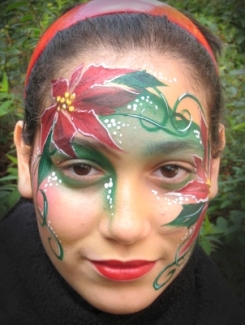
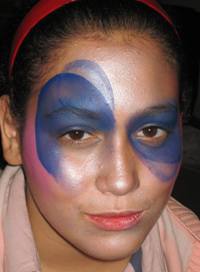
This is a very adaptable design, Bibi demonstrated it at the Bristol Convention, here it is again for those of you that missed it, or were too tired to take it all in!
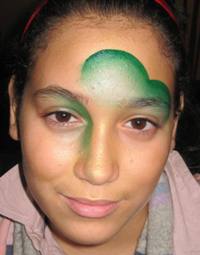
STEP 1.
Paint a thick dark green line with 2 curves, I used Wolfe dark green, and sponge out on the inside with Grimas pearlised white while still damp. Make
sure the line includes the eyebrow or it will look messy. Use the same sponge with green on it to shade green on the inside of the nose, and under
the eyes slightly.
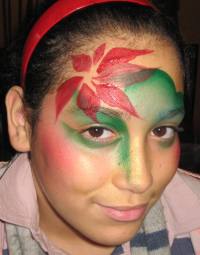
STEP 2.
Add a little blusher with Grimas red using quite a dry sponge. Blend a little Grimas pearlised gold gently over the rest of face. Decide where the
centre of the flower is, it may be useful to sponge a little dark brown here. Paint the petals with a flat brush, I used a daVinci Nova No.8. They
don't need to be a regular size, it's more important that they fit the space available well.
STEP 3.
Do the same on the other side centring on the cheek. Remember to leave a space in the middle.
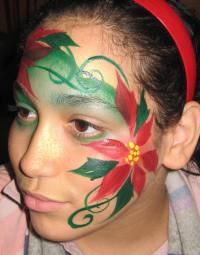
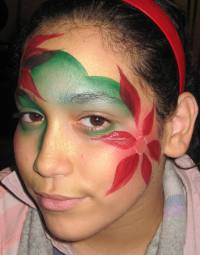
STEP 4 and 5.
Add big yellow dots in the centre of each flower. Add some green leaves the same shape as the red petals, and some generous swirls with a Grimas S2
brush.
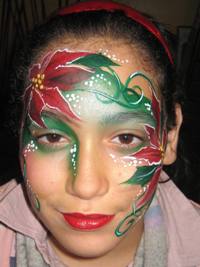
STEP 6.
Again using an S2, loosely outline each petal with white, highlight the swirls and add some snowy white dots. Red 'lipstick' completes 'the look'.
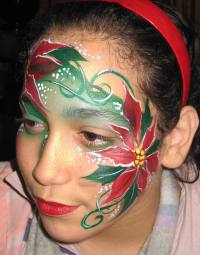
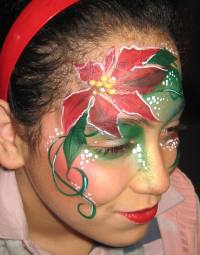
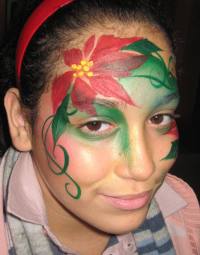
STEP 7 and 8.
The yellow dots will benefit from some shading underneath with brown and some highlights with white. Add gold glitter of course!


There are two more..... Get ready!
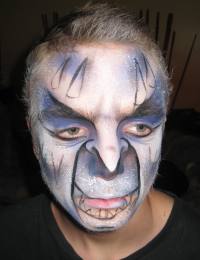
COOL JACK FROST!
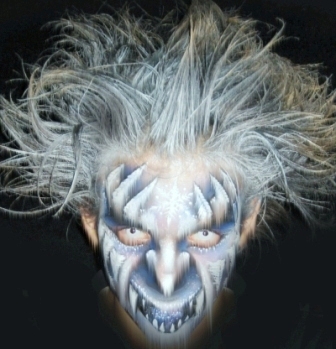
Ok, ok it was photoshopped, but looked great! I did a quick version too as I thought it was a good one to offer the evil ones known as BOYS! This was good enough to please 17 year old Henry, so can't be bad.
QUICK JACK FROST.
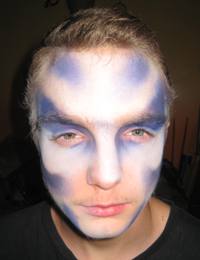
STEP 1.
Sponge Grimas cake white on all high areas of the final design, and dark blue in low areas. I used Make-up Forever dark blue from Paris! Funky Foxes
do a similar colour, but I will be upset when my nice dark blue runs out.
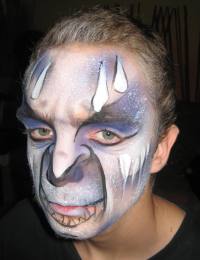
STEP 2.
Sketch out icicles and ‘new’ facial lines. I use Grimas black for sketching as it can be adjusted easily. Blend downwards away from a heavier black
line above eyes and over the end of the ‘real’ nose. Put a little white into the hair, don’t worry – it’s not a crime and it will wash out!
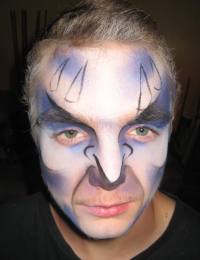
STEP 3.
Sketch in mouth and sharp teeth. I had to adjust where the line came from the ‘new’ nose. Create shadows around icicles and frown lines with a dry
brush. Add some frosty texture with a coarse stipple sponge dipped into white paint that has been sprayed with water.
STEP 4.
Paint in icicles, I used Wolfe white. Strengthen black lines, and paint under the eyes. Add some white highlights, for example at the sides of the
mouth.
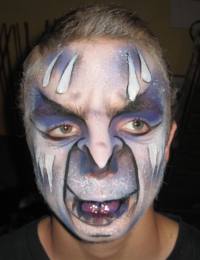
STEP 5.
Paint inside the mouth with blue and dark red (Grimas 507), adding a frosty shine to the ‘tongue’.
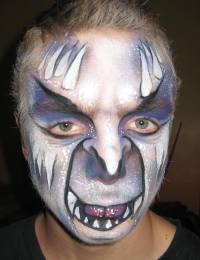
STEP 6.
Paint in the teeth, and I added some more icicles. I also added some white highlights with a sponge where needed – on the brow and nose to bring them
forward. Don't forget to sponge some white paint in their hair, and you may even get permission to use a little blue iridescent glitter.
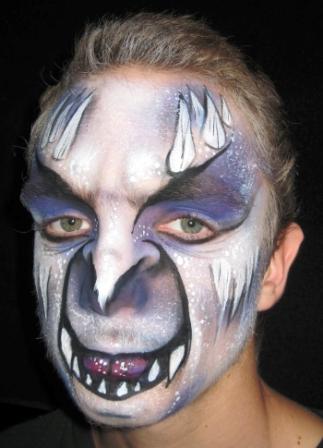
FINALLY
The icicles looked too smooth so I added some black lines, and some white dots to enhance the snowy look. It was so cold I had to add some icicles
to the end of his nose. BRRRRRR.
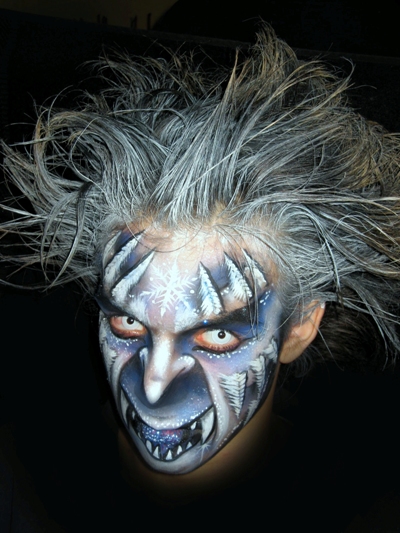
Thanks to Henry for donating a bit of his Saturday evening to us! Hope you had a chilled night out afterwards. And here's a proper look at the more complicated version:
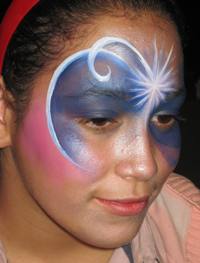
And now we can relax with something pretty, another useful design that can be adapted for lots of different applications. This one is a
STAR OF WONDER!
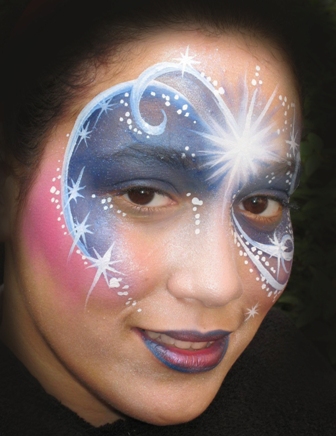
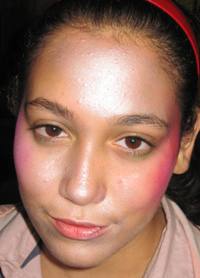
STEP 1.
Sponge a little pink gently on the cheeks, I used Grimas 508. Blend into Grimas pearlised white, use some on the forehead too.
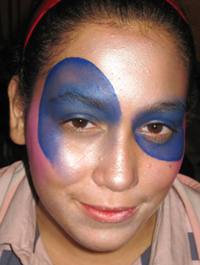
STEP 2 & 3.
Paint a big S shaped swirl in two parts, either way will work so go with what's comfortable for you. Use a dark blue or there won't be enough contrast.
Grimas 301 or 304 will work. Blend out into the pearl white with a sponge.
STEP 4.
Add a second swirl alongside the first, using less paint so that it echoes rather than repeats. Blend again with the same sponge, you won't need to
add any more paint.
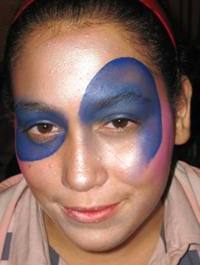
STEP 5.
Using a brush you are confident with, outline the swirls with white. Paint a large star in the middle, starting with a symmetrical cross and adding
more 'shines'. You may need to dry brush in some blue if it doesn't stand out enough.
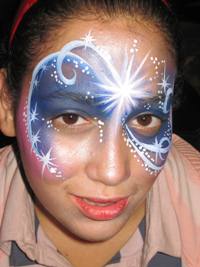
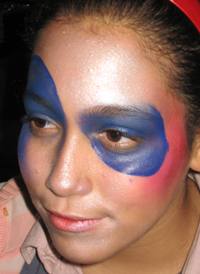
STEP 6.
Add some more stars and dots where there is space, have the stars getting larger as they come along the line.
STEP 7.
Soften the star with some Grimas white gently sponged over the middle and add some lippy, outlining the lips in blue then adding Grimas pearlised pink
753, and glitter of course. Grimas 03 (iridescent blue) looks great.